Share Project
The Share Project feature allows you to create secure, password-protected links to share your project with clients, team members, or stakeholders. You can customize what's included in the share (reports, network plans), set expiration dates, add custom branding, and track detailed statistics about how your shared projects are viewed. Additionally, you can embed your shared projects on your own website using a simple HTML file.
When to use this
- When you need to share your project with clients for review and feedback
- When collaborating with team members who don't have access to your account
- When presenting project proposals and designs to stakeholders
- When you want to track how your shared projects are being viewed
- When you need to embed your project preview on your company website
- When you want to control access with passwords and expiration dates
- When you need to customize the appearance with your company branding
Opening the share modal
To access the share functionality:
- Click on the Share menu in the left toolbar.
- The share modal will open showing your list of active shares.
- Click New Share to create a new share link.
List of active shares
The main view displays a table of all your active share links with the following information:
- Link – Copy button to quickly copy the share URL to your clipboard
- Created – Date and time when the share was created
- Valid Until – Expiration date of the share (expired shares are marked with a badge)
- Views – Total number of times the share has been viewed
- Actions – Statistics button and delete button
Quick actions
- Copy Link – Click the copy button next to any share to copy its URL to your clipboard
- View Statistics – Click the statistics icon (chart bar) to see detailed viewing statistics
- Delete Share – Click the trash icon to permanently delete a share and all its statistics
Creating a new share
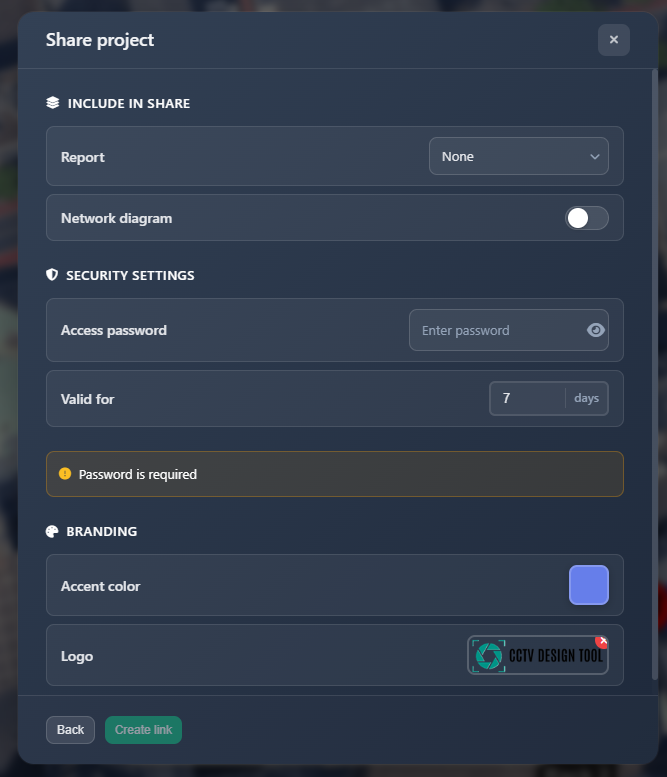
When you click New Share, you'll see a form with three main sections to configure your share.
Include in Share
This section controls what content is included in the shared project:
Report
Choose which type of report (if any) should be available in the share:
- None – No report functionality available
- Simple Report – Report created with 'Simple Report' enabled
- Document Creator – Report created with 'Document Creator' enabled
Network Plan
Toggle this option to include or exclude the network plan diagram in the shared project. When enabled, viewers can access and view the network topology diagram.
Security & Validity
This section controls access security and link expiration:
Access Password
- Password – Set a password (minimum 4 characters) that viewers must enter to access the shared project
- The password field includes a toggle to show/hide the password as you type
- Password is required and must be at least 4 characters long
Valid For
- Days – Set how many days the share link will remain active (1-30 days)
- After the expiration date, the share link will no longer be accessible
- Expired shares are automatically marked in the shares list
Branding
Customize the appearance of the shared project with your company branding:
Accent Color
- Choose a custom accent color that will be used throughout the shared project interface
- The color picker allows you to select any color for branding consistency
Logo
- Upload Logo – Click the upload button to add your company logo
- Logo Preview – Once uploaded, you'll see a preview of your logo
- Remove Logo – Click the X button on the logo preview to remove it
- Supported formats: PNG, JPEG (max 2MB)
The branding settings are automatically applied to the shared project, giving it a professional, branded appearance for your clients.
Statistics
For each share, you can view detailed statistics about how it's being viewed:
Viewing statistics
Click the statistics icon (chart bar) next to any share to open the statistics modal. The statistics table shows:
- Date – When each viewing session started
- Source – Whether the viewer accessed from Mobile or Desktop device
- Time Spent – Total time spent viewing the project in that session
- Views – Number of times the project was viewed in that session
- Report Views – Number of times the report was opened
- Network Plan Views – Number of times the network plan was viewed
Statistics are tracked per session, so you can see detailed information about each person who views your shared project.
Embedding on your website
You can embed your shared projects directly on your own website, allowing clients to view projects without leaving your site. This creates a seamless, branded experience.
Using preview.html
A minimal HTML file (preview.html) is provided that you can upload to your website. This file creates an iframe that displays your shared project.
Setup instructions
- Download or copy the
preview.htmlfile - Upload it to your website's public directory
- Link to it using your share ID as a parameter
Code
Here's the complete preview.html file:
<!DOCTYPE html>
<html>
  <head>
    <meta charset="UTF-8" />
    <meta name="viewport" content="width=device-width, initial-scale=1.0" />
    <title>Project Preview</title>
    <style>
      * {
        margin: 0;
        padding: 0;
        box-sizing: border-box;
      }
      html,
      body {
        width: 100%;
        height: 100%;
        overflow: hidden;
      }
      iframe {
        width: 100%;
        height: 100vh;
        border: none;
        display: block;
      }
    </style>
  </head>
  <body>
    <iframe id="frame" src="" allow="fullscreen" allowfullscreen></iframe>
    <script>
      const p = new URLSearchParams(window.location.search).get("p");
      if (p)
        document.getElementById("frame").src =
          "https://app.cctvdesigntool.com/share/" + p;
    </script>
  </body>
</html>
Usage
Once uploaded to your website, use it like this:
https://yourwebsite.com/preview.html?p=<share_id>Replace <share_id> with the actual ID from your share link. For example, if your share link is:
https://app.cctvdesigntool.com/share/123e4567-e89b-12d3-a456-426614174000Then your embed URL would be:
https://yourwebsite.com/preview.html?p=123e4567-e89b-12d3-a456-426614174000Benefits
- Seamless integration – Projects appear directly on your website
- Branded experience – Maintains your website's domain and branding
- No redirects – Viewers stay on your site
- Full functionality – All share features work within the iframe
- Responsive – Works on all devices and screen sizes
The iframe will automatically load the shared project and display it fullscreen, providing a professional, integrated viewing experience for your clients.
Tips
- Use strong, unique passwords for each share to maintain security
- Set appropriate expiration dates based on project timelines
- Enable reports and network plans only when needed to keep shares focused
- Regularly check statistics to see how your shared projects are being viewed
- Use branding to maintain professional appearance and brand consistency
- Embed shares on your website for a seamless client experience
- Delete expired or unused shares to keep your shares list organized
- Copy share links immediately after creation to save them for later use
- The language setting is automatically saved with each share, so viewers will see the project in the language you were using when creating the share
- Statistics track each viewing session separately, so you can see individual engagement patterns