Drawing Obstacles
Obstacles are elements that limit camera field of view (FOV) in your design. The application supports two types of obstacles: walls and obstacle objects. Walls are drawn as continuous lines that block camera vision based on their height, while obstacle objects are discrete items like cars, trucks, trees, or solar panels that can be placed and configured individually.
When to use this
- When you need to accurately represent physical barriers that will block camera field of view
- When designing camera placement and need to account for walls and structures
- When you want to add vehicles, trees, or other objects that affect camera coverage
- When creating realistic parking lot or outdoor area designs with multiple obstacles
- When you need to visualize how obstacles impact camera FOV calculations
Drawing walls
Walls are continuous barriers that limit camera field of view based on their height. To start drawing walls, click Draw → Walls in the left toolbar, or press the W key on your keyboard.
Wall drawing mode
When wall drawing mode is activated, a light overlay appears on the screen. You can adjust the opacity of this overlay using the control in the upper right corner of the screen.
Drawing toolbar
While in wall drawing mode, a toolbar appears at the top of the canvas with the following controls:
- Draw / Edit mode switcher – Toggle between Draw mode (pencil icon) for placing new wall segments and Edit mode (cursor icon) for selecting and modifying existing walls
- Grid – Show or hide a reference grid on the canvas
- Snap – Enable or disable snapping wall points to the grid
- 90° – Enable orthogonal drawing mode, which constrains wall segments to horizontal and vertical directions only
- Grid size selector – Appears when Grid or Snap is enabled; lets you choose the grid cell size (e.g. 0.5 m, 1 m, 2 m)
- Exit – Exits wall drawing mode entirely
Creating walls
- Click on the plan to place the first point of the wall
- A red line will appear following your mouse cursor from the first point, displaying the current distance of the wall
- Click again to create a wall segment between the two points and start a new segment from the second point
- Continue clicking to add more connected wall segments
Entering an exact wall length
While drawing a wall segment, a distance indicator follows your cursor showing the current segment length. To set a precise length, start typing a number — the indicator switches to input mode and shows a blinking cursor. Press Enter to confirm the value and place the wall point at exactly that distance from the previous point.
Exiting wall drawing mode
To stop drawing walls (but remain in wall drawing mode), press ESC or click the ESC button in the upper right corner. To completely exit wall drawing mode, press ESC again or press the W key.
Editing walls
After exiting wall drawing mode, you can edit existing walls by clicking on them.
Wall selection and toolbar
When you click on a wall, the overlay reappears, the selected wall is highlighted, and a mini toolbar appears with the following options:
- Cut – Divides the wall into two shorter segments at the clicked point. You can also right-click on the wall to add a point and divide it
- Delete – Removes the wall (or press DELETE key)
- Set wall height – Changes the height of the wall, which affects how it blocks camera FOV
Moving wall points
You can also click and select individual points of the wall. Once selected, you can drag the point to a new position, which will reshape the wall accordingly.
Wall appearance
To change the appearance of walls, including their color and thickness, go to App Settings in the Walls section.
Adding obstacles
Obstacle objects are discrete items that can be placed individually in your design. To add an obstacle, select Draw → Obstacle from the left toolbar.
A car object is added to your project by default, and the obstacle settings sidebar appears on the right side of the screen.
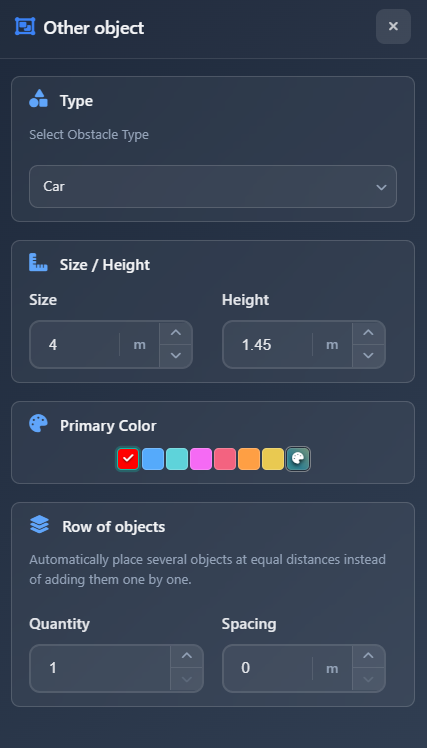
Configuring obstacles
The obstacle settings sidebar allows you to customize the obstacle object:
- Obstacle type – Change the type of obstacle: car, truck, tree, solar panels, and others
- Size – Adjust the dimensions of the obstacle
- Color – Modify the color scheme of the obstacle
- Row of objects – Create a row of identical objects spaced at a specified distance. This is useful for creating parking lots or multiple obstacles without manually adding and positioning each one
Manipulating obstacles
Obstacles are manipulated the same way as other objects in the application:
- Click on an obstacle to select it – a blue rectangle appears around the object
- Drag the obstacle to move it to a new position
- Use the rotation handles to rotate the obstacle as needed
Obstacles limit camera FOV similar to walls, affecting the calculated field of view in your design.
Tips
- Adjust the wall drawing overlay opacity in the upper right corner if it's too bright or distracting
- Use the row of objects feature when creating parking lots or multiple identical obstacles to save time
- Right-click on a wall to quickly add a point and divide it, which is faster than using the Cut tool
- Set appropriate wall heights to accurately represent how they block camera vision
- You can change wall appearance (color and thickness) in App Settings to match your project's visual style
- Press ESC twice (or ESC then W) to completely exit wall drawing mode
- Enable Snap and 90° together when drawing rooms or rectangular areas to keep walls perfectly aligned
- Type a number while drawing to enter an exact wall segment length instead of placing it by eye