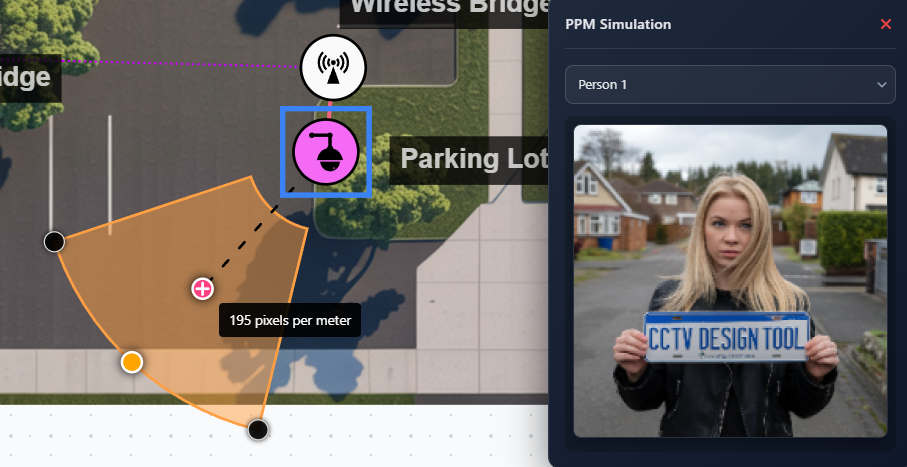
PPM Indicator
The PPM (Pixels Per Meter) Indicator is an interactive tool that helps you visualize and understand the pixel density at any point within a camera's field of view. By displaying a draggable point on the FOV and calculating the PPM value at that location, you can determine whether a camera can capture sufficient detail for identification or recognition at specific distances. The indicator also provides a preview window that shows a simulated image representation of what the camera would see at the selected PPM value, helping you assess image quality and detail level.
When to use this
- When you need to verify if a camera can capture sufficient detail at a specific distance
- When determining the optimal camera placement for identification purposes
- When comparing different camera models and their resolution capabilities
- When planning camera coverage and need to understand detail levels at various distances
- When explaining camera capabilities to clients or stakeholders with visual examples
Enabling PPM Indicator
The PPM Indicator can be enabled in the Layers panel:
- Click the Layers button in the toolbar
- Enable the Show PPM option
- Select a camera to view its FOV
- The PPM indicator will appear on the selected camera's FOV only
The indicator consists of two parts:
- Interactive PPM point – A draggable orange circle on the FOV
- PPM preview window – A simulation window that appears when you interact with the point
Interactive PPM point
Moving the PPM point
- Click and drag the orange circle to move it to any location within the FOV
- The point is constrained to stay within the FOV boundaries
- As you drag, the PPM value updates in real-time
- A tooltip appears showing the current PPM value at that point
PPM calculation
The PPM value is calculated based on:
- Camera resolution – The maximum horizontal resolution of the camera
- Distance from camera – The straight-line distance from the camera to the selected point
- Camera height – The installation height of the camera
- FOV angle – The horizontal field of view angle
The calculation accounts for the camera's perspective and provides an accurate pixel density measurement at the selected point.
PPM preview window
When you interact with the PPM point, a preview window appears in the top-right corner of the screen showing a simulated image representation.
Window features
The preview window includes:
- Header – "PPM Simulation" title with close button
- Image selector – Dropdown to choose different test images
- Simulated image – Shows what the camera would see at the selected PPM value
- Zoom lens – Hover over the image to see a magnified view
Selecting test images
The dropdown allows you to select from various test images:
- Standard test images – Various scenes and objects
- Thermal images – For thermal cameras (automatically selected for thermal cameras)
- Different scenarios – Various lighting and scene conditions
Each image helps you visualize how the camera would perform at the selected PPM value.
Zoom lens feature
When you hover over or touch the preview image:
- A zoom lens appears following your cursor or finger
- The lens shows a 2x magnified view of the area under the cursor
- This helps you examine fine details in the simulated image
- The lens disappears when you move your cursor away
The zoom lens is particularly useful for:
- Examining text readability
- Checking facial recognition quality
- Assessing license plate readability
- Evaluating detail level at the selected PPM
Closing the preview
Click the close button (×) in the preview window header to close it. The window will also close automatically when you stop interacting with the PPM point.
Tips
- Use PPM values to verify that critical areas meet your detail requirements
- Move the PPM point to different distances to understand how detail changes with distance
- Use the zoom lens in the preview to examine fine details in the simulated image
- Test with different image types to see how the camera performs in various scenarios
- Use the preview window to visually demonstrate camera capabilities to clients