Floors
The Floors feature allows you to create and manage multiple floors in your project, enabling you to design multi-level buildings with floors above ground, a ground floor, and basement levels. Each floor can have its own name and height configuration, and you can easily switch between floors to place cameras, devices, and other objects on different levels. This is essential for accurately modeling multi-story buildings and calculating cable lengths across different levels.
When to use this
- When designing CCTV or low-voltage systems for multi-story buildings
- When you need to organize your project by different building levels
- When you want to accurately calculate cable lengths across different floors
- When you need to visualize and manage a building with multiple levels, including basements
- When you want to assign cameras and devices to specific floors for better organization
Floor selector button
The Floor selector button is located in the bottom center toolbar. It displays the name of the currently selected floor and has a distinctive outline when a floor other than ground floor is selected.
- Click the button to open a popup menu showing all available floors
- The popup displays floors in three sections:
- Above Ground – Floors above the ground level (numbered +1, +2, +3, etc.)
- Ground Floor – The main ground level (can be renamed)
- Basement – Floors below ground level (numbered B1, B2, B3, etc.)
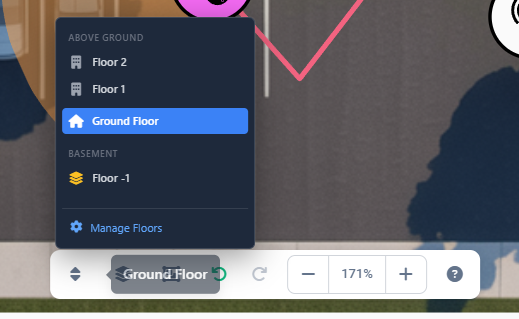
- Select a floor by clicking on it in the popup menu. The selected floor becomes active, and you can place objects on it.
- Manage Floors button at the bottom of the popup opens the floor editor modal.
Managing floors
To add, edit, or remove floors, click the Manage Floors button in the floor selector popup. This opens a modal dialog with a comprehensive floor management interface.
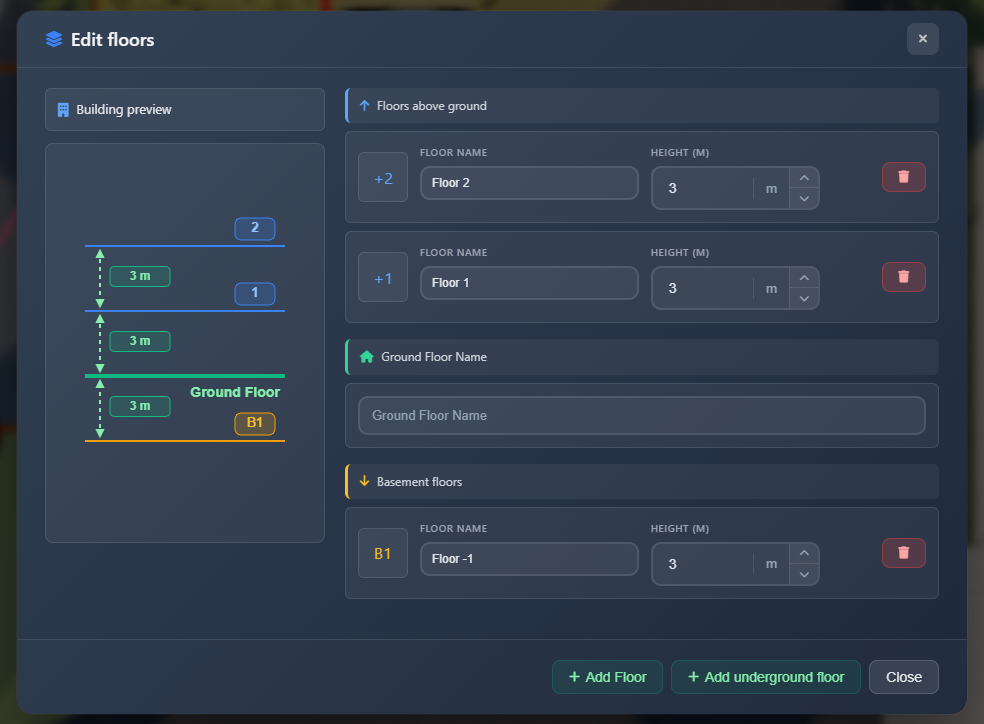
The floor editor consists of two main panels:
Building preview
If you have floors above or below ground, a visualization panel appears on the left showing a side view of your building structure. This preview helps you understand the relative heights and positions of all floors in your building.
Floor list panel
The right panel contains all floor management options, organized into three sections:
Floors above ground
This section lists all floors above the ground level, displayed in descending order (highest floor first). For each floor, you can configure:
- Floor name – A custom display name for the floor (e.g., "First Floor", "Office Level")
- Height – The height of the floor in your project's units (meters or feet). This affects cable length calculations.
Ground floor
The ground floor section allows you to set a custom name for the ground level. This name appears in the floor selector and throughout the application.
Basement floors
This section lists all floors below ground level, displayed in ascending order (B1, B2, B3, etc.). Each basement floor can be configured with:
- Floor name – A custom display name (e.g., "Parking Level", "Storage")
- Height – The height of the basement floor
Adding floors
To add a new floor:
- Open the floor editor by clicking Manage Floors in the floor selector popup.
- Click one of the buttons in the modal footer:
- Add Floor – Creates a new floor above ground level
- Add Underground Floor – Creates a new basement floor below ground level
New floors are created with default names and heights. You can immediately edit these values in the floor list.
Editing floor properties
To edit a floor's name or height:
- Open the floor editor modal.
- Locate the floor you want to edit in the appropriate section (Above Ground, Ground Floor, or Basement).
- Modify the Floor name or Height fields directly in the floor card.
- Changes are saved automatically when you close the modal.
Deleting floors
To delete a floor:
- Open the floor editor modal.
- Click the delete button (trash icon) on the floor card you want to remove.
- Confirm the deletion in the warning dialog.
DANGER
Deleting a floor will permanently remove:
- All cameras on that floor
- All devices on that floor
- All connections with points on that floor
- All walls, obstacles, and other objects on that floor
- All images on that floor
After deletion, all floors above or below the deleted floor are automatically renumbered to maintain sequential numbering. All objects on those floors are also moved to their new floor numbers.
Floor numbering system
The application uses a consistent numbering system:
- Ground floor is always numbered as 0
- Floors above ground are numbered as positive integers: +1, +2, +3, etc.
- Basement floors are numbered as negative integers: -1, -2, -3, etc., but displayed as B1, B2, B3
When you delete a floor, the remaining floors are automatically renumbered to maintain this system. For example, if you delete floor +2, floor +3 becomes +2, and all objects on that floor are updated accordingly.
Tips
- Use descriptive floor names (e.g., "Parking Level", "Office Floor 2") to make it easier to identify floors in large projects
- Set accurate floor heights as they affect cable length calculations
- The ground floor name appears throughout the application, so choose a clear, professional name
- Before deleting a floor, make sure you've moved or exported any important objects you want to keep
- The building preview visualization helps you understand the structure of multi-level buildings
- You can switch between floors quickly using the floor selector button without opening the editor
- When working on multi-story buildings, assign cameras and devices to the correct floor for accurate documentation