Batch Change
The Batch Change feature allows you to edit properties of multiple cameras and devices simultaneously, saving significant time when you need to apply the same changes to many items. You can select multiple cameras or devices from a comprehensive table, change their models, modify common properties like installation height, display names, colors, icons, and network settings — and also reorder the list of cameras or devices to control the order in which they appear in reports and exports.
When to use this
- When you need to change the same property (height, color, display name) for multiple cameras or devices
- When you want to replace multiple cameras or devices with a different model at once
- When you need to standardize display names or colors across multiple items
- When you want to quickly update installation heights for all cameras on the same floor
- When you need to change device types or icons for multiple devices simultaneously
- When you want to control the order in which cameras or devices appear in reports
Opening Batch Change
To access the Batch Change feature:
- Click on the Tools menu in the left toolbar.
- Select Batch Change from the dropdown menu.
- The Batch Change modal will open with two tabs at the top: Batch Edit and Reorder.
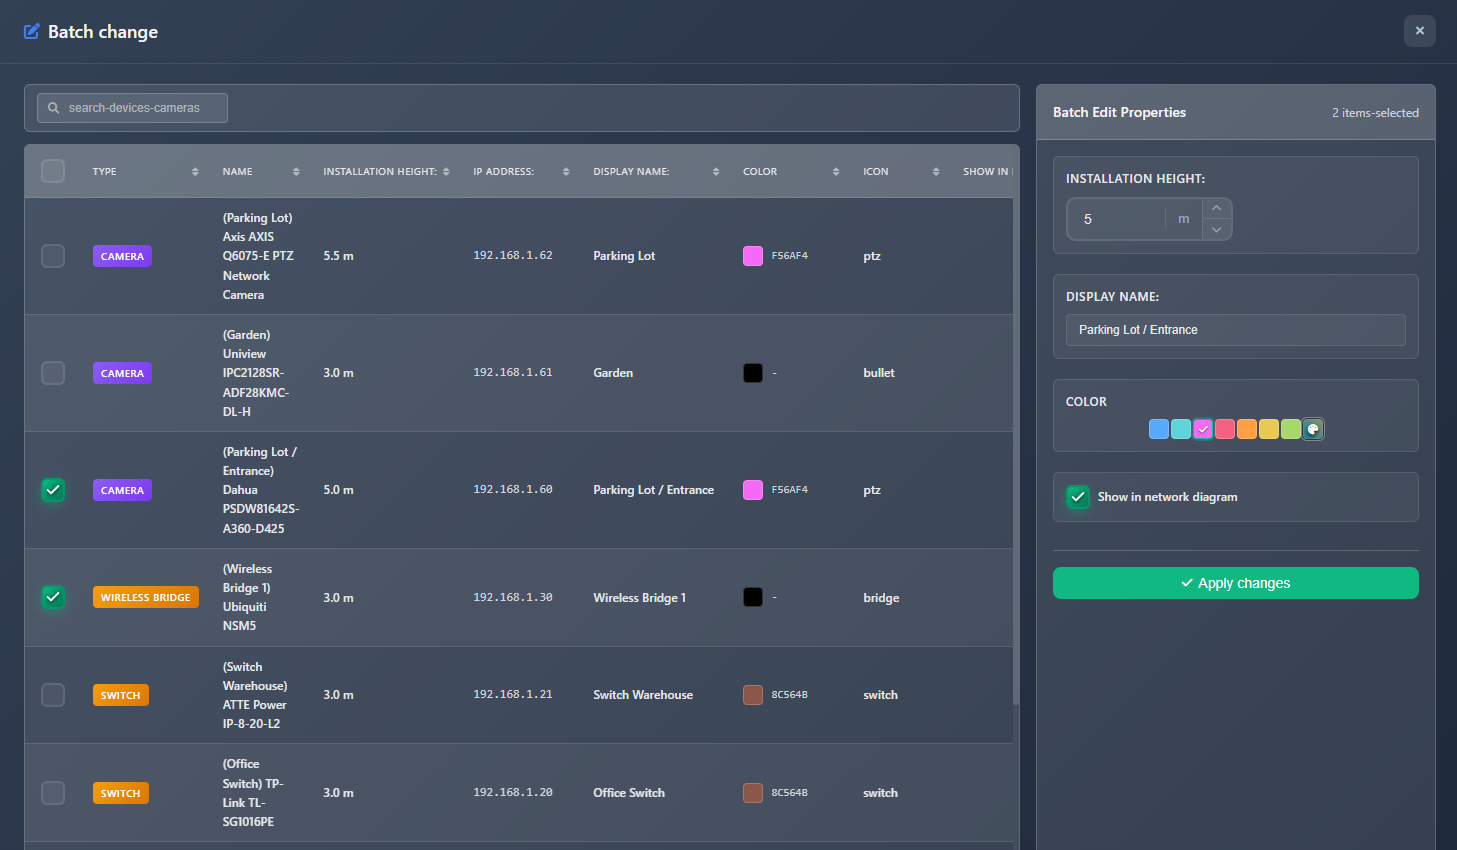
Batch Edit tab
Items table
The main table displays all cameras and devices in your project with the following information:
- Type – Badge indicating whether the item is a Camera or Device type
- Name – Device/camera name (display name if set, otherwise manufacturer and model)
- Installation Height – Current installation height
- IP Address – Current IP address (if configured)
- Display Name – Custom display name
- Color – Icon/device color
- Icon – Camera type or device icon
- Show in Network Diagram – Whether the item appears in network diagrams
Selecting items
- Individual selection – Click the checkbox next to each item to select it
- Select All – Click the checkbox in the table header to select/deselect all visible items
- Search – Use the search box to filter items by name, manufacturer, model, display name, or IP address
- Sort – Click column headers to sort the table by any column
Selected items are highlighted, and a properties panel appears on the right side of the interface.
Batch editing properties
When you select one or more items, a properties panel appears on the right side allowing you to edit common properties that will be applied to all selected items.
Installation height
Set the installation height for all selected items. The value is displayed in your project's units (meters or feet).
Display name
Set a custom display name for all selected items. This name appears on the plan and in reports when display names are enabled.
Color
Change the icon/device color for all selected items. Use the color picker to select a new color.
Icon / Camera type
- For cameras – Change the camera type (icon) for all selected cameras
- For devices – Change the device icon for all selected devices
This option only appears when all selected items are of the same type (all cameras or all devices).
Show in network diagram
Toggle whether selected items appear in network diagrams. This checkbox applies to all selected items.
Device type (devices only)
For devices only, you can change the device type (e.g., Router, Switch, Access Point). This option only appears when all selected items are devices.
WARNING
Changing device type may reset some device-specific properties and specifications.
Visual feedback
Properties that have been changed from their original values are highlighted with a blue border and background, making it easy to see which properties you've modified before applying changes.
Changing models
You can replace multiple cameras or devices with different models at once. This feature is only available when all selected items are of the same type (all cameras or all devices).
Changing camera models
When cameras are selected:
- Click the Change Model button in the properties panel
- Choose from two tabs:
- Catalog – Browse and select from the camera catalog
- Favorites – Select from your favorite cameras
- Select the new camera model
- All selected cameras will be replaced with the new model while preserving their positions and other settings
Changing device models
When devices are selected:
- Click the Change Model button in the properties panel
- Choose one of two options:
- Select from Catalog – Browse and select from the device catalog
- Custom Device – Select from your saved custom devices using the dropdown
- All selected devices will be replaced with the new model
WARNING
When changing models, the new model is applied to all selected items. Make sure all selected items should use the same replacement model.
Applying changes
After modifying properties or changing models:
- Review the changes in the properties panel (changed properties are highlighted)
- Click the Apply Changes button
- All selected items will be updated with the new values
- The selection is cleared, and you can select new items for batch editing
Only properties that you've actually changed are applied. Properties that haven't been modified remain unchanged on the selected items.
Reorder tab
The Reorder tab lets you change the order of cameras and devices in your project. This order is used when generating reports and exports, so it determines the sequence in which items appear in camera lists, device tables, and BOM pages.
Switching between cameras and devices
At the top of the tab, use the toggle to switch between the Cameras list and the Devices list. The count of items is shown on each button. Both lists can be reordered independently — your changes to each are preserved until you click Apply Order.
Quick sort options
Use the quick sort chips to instantly sort the current list:
| Button | Sort logic |
|---|---|
| A→Z | Alphabetical order by name |
| Floor | By floor (0 → 1 → 2 …), then alphabetically within each floor |
| IP | By IP address (numeric octet sort), items without an IP go last |
| Type | By camera type or device type, then alphabetically |
| Height ↓ | By installation height, tallest first |
| ⇄ Reverse | Flips the current order |
Quick sorts can be combined — for example, click Floor and then A→Z to get items sorted first by floor and then alphabetically within each group.
Drag and drop
Each item in the list can be grabbed by the ⠿ handle on the left and dragged to a new position. A blue line indicator shows exactly where the item will be placed when you release it.
Each item displays:
- Floor badge – color-coded by floor number for quick visual grouping
- Camera / device icon
- Full name (manufacturer, model, display name)
- Meta tags – IP address, camera type or device type, installation height
- Color dot – the item's assigned color
Applying the new order
- Rearrange items using drag and drop or quick sort buttons
- Click Apply Order
- A success notification confirms the change
- The new order is immediately reflected in all reports and exports
Resetting the order
Click Reset to discard all unsaved changes and restore the order to what it was when you opened the Reorder tab.
TIP
The reorder only affects the logical sequence of items (report order). It does not move camera or device icons on the floor plan.
Tips
- Use search to quickly find specific cameras or devices before selecting them for batch changes
- Select items of the same type (all cameras or all devices) to access more editing options like icon/type changes
- The visual highlighting of changed properties helps you review modifications before applying
- Use "Select All" combined with search filters to quickly select groups of items
- Change models first if needed, then edit other properties in a second batch operation
- Display names can be set in bulk to create consistent naming conventions across your project
- Installation height is useful for standardizing camera heights on the same floor or level
- Color changes help visually group related devices or cameras in your design
- Remember that changing device type may reset some device-specific properties
- Use Floor quick sort in the Reorder tab to group all cameras by floor before generating a report
- Use IP quick sort to arrange cameras in subnet order for network documentation