Layers
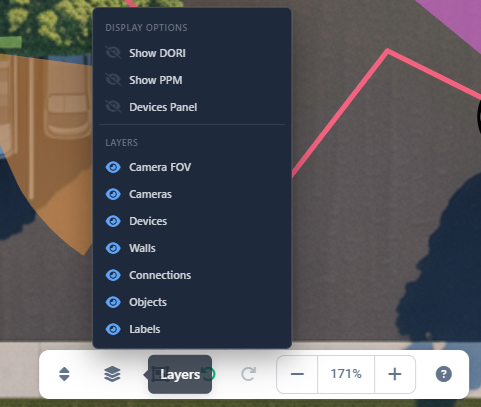
The Layers feature allows you to control the visibility of different elements on your project canvas. You can show or hide cameras, devices, walls, connections, objects, labels, and various display options like DORI zones and PPM (Pixel Per Meter) information. This helps you focus on specific aspects of your design, reduce visual clutter, and create cleaner views for presentations or documentation.
When to use this
- When you need to focus on specific elements by hiding others (e.g., viewing only cameras and FOV)
- When preparing presentations or reports and want to show only relevant elements
- When working with complex projects and need to reduce visual clutter
- When you want to toggle DORI zones or PPM information for camera analysis
- When you need to temporarily hide certain layers to make editing easier
Layers button
The Layers button is located in the bottom center toolbar. It displays a distinctive outline and a small badge when not all layers are visible, providing a quick visual indicator of your current layer visibility state.
- Click the button to open the layers popup menu
- The button shows an amber outline and a badge when one or more layers are hidden
- When all layers are visible, the button appears normal without any indicators

Display options
The Display Options section contains settings that control additional visual information and panels:
Show DORI
DORI (Detection, Observation, Recognition, Identification) zones display color-coded areas on camera FOVs indicating the effective range for different surveillance purposes. When enabled, camera FOVs show zones with different colors representing detection, observation, recognition, and identification distances.
Show PPM
PPM (Pixel Per Meter) displays a draggable point on camera FOVs that you can move to any location. The PPM value is calculated for that specific point and displayed in the top-right corner of the image simulation preview in the right sidebar. This helps you understand the pixel density and resolution at different distances from the camera, which is crucial for determining if a camera can capture sufficient detail for identification or recognition at specific locations.
More about PPM: PPM
Devices Panel
Toggles the visibility of the Devices Panel, which shows a list of all cameras and devices in your project. This panel can be useful for quick navigation and selection, but you may want to hide it to maximize canvas space.
More about Devices Panel: Devices Panel
Layers
The Layers section controls the visibility of main project elements. Each layer can be toggled on or off independently:
Camera FOV
Controls the visibility of camera Field of View visualizations. When hidden, camera FOV areas are not displayed, but cameras themselves remain visible (if the Cameras layer is enabled).
Cameras
Controls the visibility of camera icons and symbols on the canvas. When hidden, cameras are not displayed, but their FOVs may still be visible if the Camera FOV layer is enabled.
Devices
Controls the visibility of network device icons and symbols. This includes routers, switches, NVRs, access points, and other non-camera devices.
Walls
Controls the visibility of wall objects drawn on the canvas. Walls are important for accurate FOV calculations as they represent physical obstructions.
Connections
Controls the visibility of connection lines between cameras and devices. When hidden, the physical cable routes and network connections are not displayed.
Objects
Controls the visibility of obstacle objects and other drawn elements (rectangles, legends, etc.) on the canvas.
Labels
Controls the visibility of text labels, display names, and other text annotations on the canvas. This includes camera names, device names, and other text elements.
Toggling layer visibility
To show or hide a layer:
- Click the Layers button in the bottom center toolbar.
- In the popup menu, click on any layer item to toggle its visibility.
- The icon changes from an eye (visible) to a crossed-out eye (hidden) to indicate the current state.
- The canvas updates immediately to reflect the changes.
INFO
Hidden layers are not removed from your project—they are simply not displayed. All objects remain in the project and can be made visible again at any time.
Tips
- Hide layers you're not currently working with to reduce visual clutter and improve performance
- Use the Layers feature when exporting images or PDFs to create cleaner, more focused documentation
- Toggle DORI zones on when analyzing camera coverage and effectiveness
- Show PPM information when you need to verify if cameras can capture sufficient detail at specific distances
- Hide the Devices Panel when you need maximum canvas space for design work
- Remember that hidden layers don't affect calculations—FOV, cable lengths, and other calculations still work normally
- Use layer visibility to create different views of the same project for different audiences (technical vs. client presentations)
