Document Creator
The Document Creator is an advanced, flexible report building tool that gives you complete control over every aspect of your document. Unlike Simple Report which uses templates, Document Creator allows you to manually build reports by adding individual pages and elements, customizing each component, and arranging content exactly as you need it. You can create camera-specific pages, summary pages, text pages, and combine various elements like images, tables, FOV visualizations, PPM simulations, and more to create highly customized, professional documentation.
When to use this
- When you need complete control over document layout and content arrangement
- When you want to create highly customized reports that don't fit standard templates
- When you need to manually select and arrange specific elements for each page
- When you want to create camera-specific pages that automatically generate for each camera
- When you need to save and reuse custom report layouts as templates
Opening Document Creator
To access the Document Creator:
- Click on the Report Creation menu in the left toolbar.
- Select Document Creator from the dropdown menu.
- The Document Creator interface will open in full-screen mode.
The interface consists of:
- Left sidebar – Page list and actions
- Center area – Page editor with A4 page preview
- Right sidebar – Element editor (appears when editing elements)
- Top toolbar – Zoom controls and close button
Interface overview
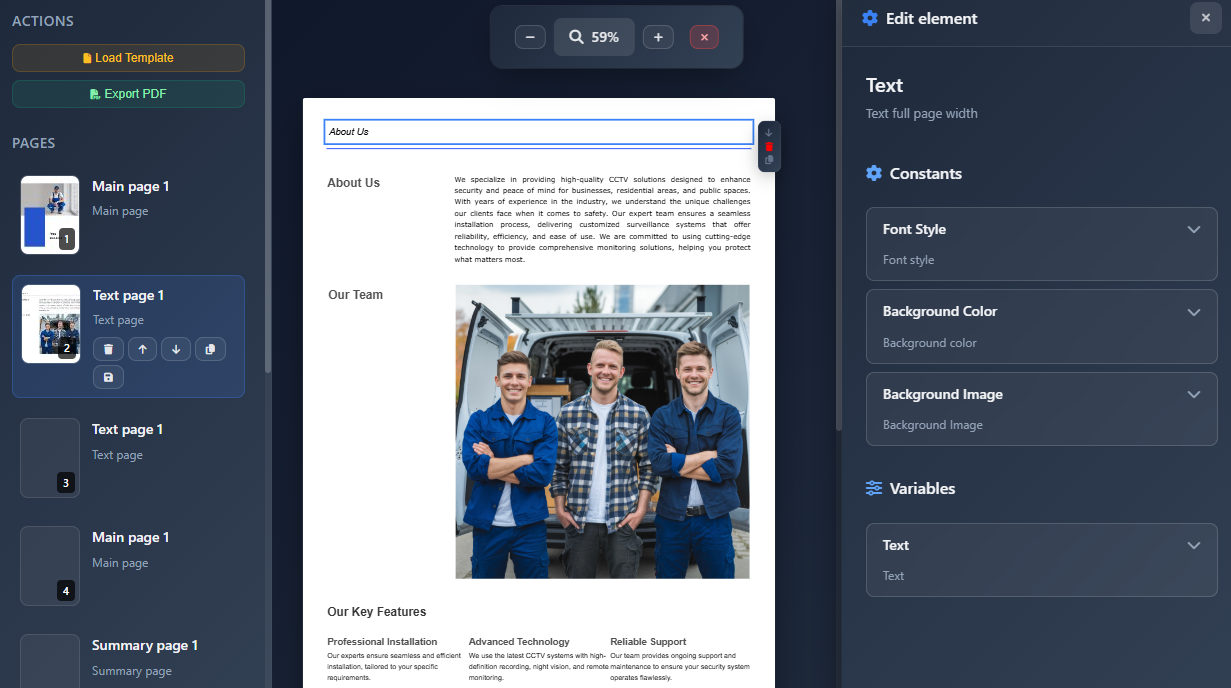
Left sidebar
The left sidebar displays:
- Actions section – Load template and Export PDF buttons
- Pages list – Thumbnails and details of all pages in your document
- Add New Page button – Create a new page
The sidebar can be minimized by moving your mouse away from it, showing only page thumbnails.
Center area
The center area shows:
- A4 page preview – Your current page displayed at A4 size (210mm × 297mm)
- Page elements – All elements added to the current page
- Add Element button – Add new elements to the current page
Right sidebar
The right sidebar appears when:
- Editing an element – Shows element-specific settings and properties
- Adding an element – Displays the element library to choose from
Top toolbar
The top toolbar provides:
- Zoom controls – Zoom in/out and reset to 100%
- Close button – Exit Document Creator
Managing pages
Adding a new page
- Click the Add New Page button at the bottom of the pages list
- Select a page type:
- Camera Page – Creates one page for each camera in your project
- Summary Page – General summary page
- Text Page – Blank page for custom content
- Main Page – Main/overview page
- If creating a Camera Page, it will automatically generate pages for all cameras
- The new page(s) will appear in the pages list
Page types
- Camera Page – Automatically creates one page per camera. Elements on these pages can link to camera-specific data (FOV, PPM, camera details, etc.)
- Summary Page – For tables, lists, and summary information (BOM, connections, pricing, etc.)
- Text Page – Blank page for custom text and content
- Main Page – Overview or introduction pages
Navigating pages
- Click on a page thumbnail in the left sidebar to switch to that page
- The active page is highlighted in the pages list
- Page thumbnails are automatically generated and updated
Page actions
When a page is selected, you can:
- Delete – Remove the page from your document
- Move Up – Move the page earlier in the document (if not first)
- Move Down – Move the page later in the document (if not last)
- Copy – Duplicate the page
- Save as Template – Save the page layout as a reusable template
Adding elements
Elements are the building blocks of your document pages. Each element represents a specific type of content.
Adding an element
- On the current page, click the Add Element button (appears at the bottom of the page)
- The right sidebar opens showing the Element Library
- Browse available element categories:
- Camera Elements – FOV images, PPM simulations, camera details tables
- Overview Elements – Project overview images
- Tables and Lists – BOM, connections, pricing, HDD calculations
- Company Info – Company headers with logos
- Static Elements – Text blocks, images, separators
- Click on an element to add it to your page
- The element is added and the editor opens automatically
Editing elements
Selecting an element
- Click on any element on the page to select it
- Selected elements show a blue outline and an edit box with controls
- The right sidebar opens showing element-specific settings
Element controls
When an element is selected, an edit box appears with controls:
- Arrow Up – Move element up in the page (change order)
- Arrow Down – Move element down in the page
- Trash – Delete the element
- Copy – Duplicate the element
Element settings
The right sidebar shows all editable properties for the selected element:
- Text fields – Edit text content
- Image fields – Upload or select images
- Number fields – Adjust numeric values
- Boolean toggles – Enable/disable features
- Date pickers – Select dates
- Color pickers – Choose colors
- Dropdowns – Select from predefined options
Settings vary by element type. For example:
- FOV elements – Allow selecting which camera channel to display
- PPM elements – Let you set the distance for PPM calculation
- Table elements – Provide sorting and filtering options
- Text elements – Offer font styling, alignment, and formatting
Element types and their data
Many elements automatically link to project data:
- Camera elements on Camera Pages automatically use data from the associated camera
- Table elements can display cameras, devices, connections, pricing, or HDD data
- Overview elements generate images based on current project state
- Company info elements use your saved company branding information
Working with templates
Loading a template
- Click Load Template in the left sidebar Actions section
- Browse available saved templates
- Select a template to load
- Confirm that existing pages will be replaced
- The template pages are loaded into your document
DANGER
Loading a template replaces all existing pages. Make sure to save your work or export it before loading a new template.
Saving as template
- Select the page you want to save
- Click the Save as Template button (floppy disk icon) in the page actions
- Enter a name and description for your template
- The template is saved and can be reused in future documents
Templates are particularly useful for:
- Standard page layouts you use frequently
- Company-specific page designs
- Reusable camera page layouts
- Consistent summary page formats
Zoom and view controls
The top toolbar provides zoom controls:
- Zoom Out (–) – Decrease zoom level
- Zoom Display – Shows current zoom percentage (click to reset to 100%)
- Zoom In (+) – Increase zoom level
Exporting to PDF
To export your document as PDF:
- Click Export PDF in the left sidebar Actions section
- The system processes all pages:
- Generates images for FOV, PPM, and overview elements
- Processes all elements and data
- Shows progress with a progress bar
- The PDF is generated and automatically downloaded
- File name is based on your project name
Tips
- Start with a template if available—it saves time and ensures consistency
- Use Camera Pages for detailed camera documentation—they automatically generate pages for each camera
- Combine different element types to create comprehensive pages
- Use separators to visually organize content on pages
- Save frequently used page layouts as templates for future projects
- Preview your document by scrolling through pages before exporting
- Use the zoom feature to check details and ensure proper alignment
- Element order matters—use the up/down arrows to arrange elements logically
- Camera elements automatically link to camera data—no manual data entry needed
- Use Summary Pages for tables and lists that aggregate project information
- Company info elements automatically use your saved branding settings
- Copy elements to quickly duplicate similar content with minor modifications
- Delete unused pages to keep your document focused and manageable
- Export to PDF regularly to review the final output and catch any issues early