Export to PDF/JPG
The Export to PDF/JPG feature allows you to generate high-quality images or PDF documents from your project plan. You can customize which elements are included, select specific floors, control layer visibility, choose camera FOVs to display, add branding elements (logo and watermark), and configure output quality and format settings. This is essential for creating professional documentation, proposals, and presentations for clients.
When to use this
- When you need to create visual documentation of your project for clients or team members
- When preparing proposals and quotes that require professional project plans
- When you want to export specific floors or selected camera views
- When creating presentation materials with custom branding
- When you need high-quality images or PDFs for printing or digital distribution
Opening the export sidebar
To access the export functionality:
- Click on the Export menu in the left toolbar.
- Select Export to PDF/JPG from the dropdown menu.
- The export sidebar will appear on the right side of the screen with all export options.
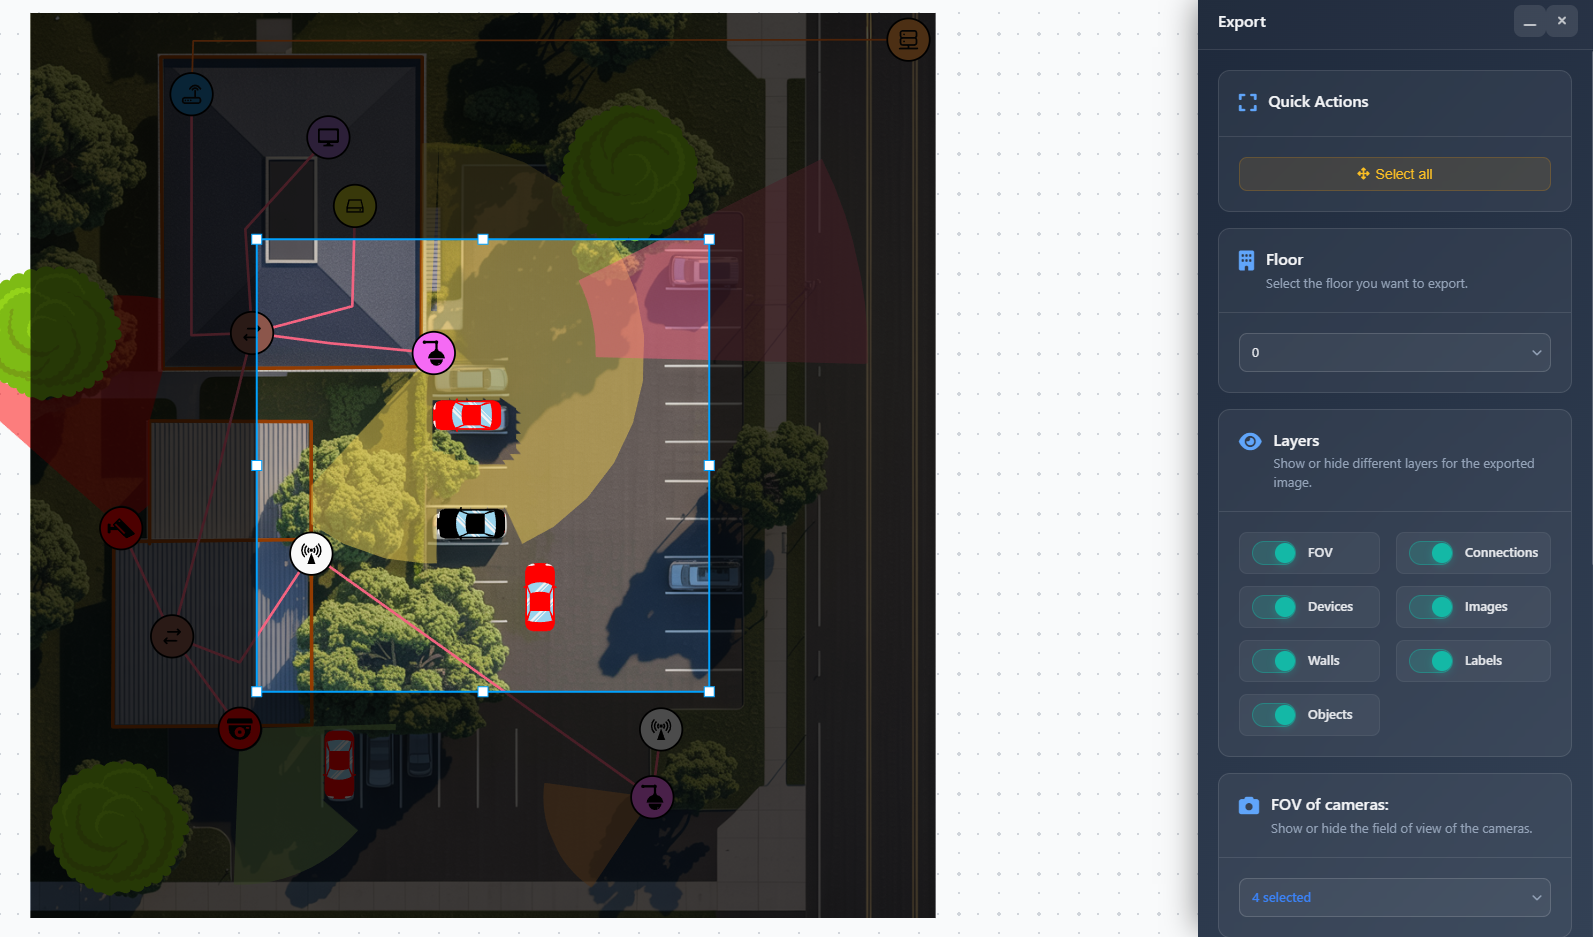
Quick actions
The Quick Actions section provides a convenient button to automatically fit your entire project to the canvas view:
- Select All – Automatically adjusts the canvas view to show all elements of your project, ensuring everything is visible in the export.
Floor selection
The Floor Selection dropdown allows you to choose which floor to export:
- Select a specific floor number
- Only the selected floor and its elements will be included in the export
- This is useful for multi-story buildings where you want to export each floor separately
Layers
The Layers section allows you to control which elements are visible in your export. You can toggle the visibility of:
- FOV – Camera Field of View visualizations
- Devices – Network devices and equipment icons
- Walls – Wall objects and obstacles
- Connections – Connection lines between devices
- Images – Background images and uploaded images
- Labels – Text labels and display names
- Objects – Other drawn objects and elements
Each layer can be independently enabled or disabled to create the exact view you need for your export.
FOV cameras selection
When the FOV layer is enabled, an additional section appears allowing you to select which cameras' FOVs should be displayed:
- Use the multi-select dropdown to choose specific cameras
- Only selected cameras will show their FOV in the export
- This is useful when you want to highlight specific camera coverage areas or create focused views
The camera list shows each camera's display name, manufacturer, and model for easy identification.
Branding
The Branding section allows you to add your company logo and watermark to exports. This feature is available for Premium and Enterprise users.
Enabling branding
Toggle the Branding switch to enable branding options. When enabled, you can configure:
Watermark
- Watermark toggle – Enable or disable watermark text
- Watermark text – Enter custom text that will appear as a watermark on the export
- Click Save Watermark to save your watermark settings for future use
Logo
- Logo toggle – Enable or disable company logo
- Logo upload – Click to upload your company logo image file
- Position – Choose where the logo appears:
- Top Left
- Top Right
- Bottom Left
- Bottom Right
- Image scale – Adjust the size of the logo using the slider (0.1x to 4x)
The logo preview shows how your logo will appear in the export.
WARNING
Some branding settings may require specific permissions. If you don't have permission to change branding settings, a warning message will be displayed.
File type
Choose the output format for your export:
- JPG – Image format suitable for digital use and presentations
- PDF – Document format ideal for printing and professional documentation
PDF settings
When PDF is selected, additional options become available:
- Page size – Choose from standard paper sizes:
- A4, A3, A2, A1, A0
- Letter, Legal, Tabloid
- Orientation – Select portrait or landscape orientation
These settings ensure your PDF export matches your intended use case, whether for printing or digital viewing.
Quality
Set the quality level for your export:
- High – Maximum quality, larger file size, best for printing and professional use
- Medium – Balanced quality and file size, suitable for most purposes
- Low – Smaller file size, faster processing, suitable for quick previews or email attachments
Choose the quality level based on your intended use. For client presentations and printing, use High quality. For quick previews or digital sharing, Medium or Low may be sufficient.
Exporting
Once you've configured all your export settings:
- Review your settings in the sidebar
- Ensure the canvas shows the view you want to export
- Click the Export button at the bottom of the sidebar
- The export will be generated and downloaded to your computer
The export will include:
- All visible layers based on your layer settings
- The selected floor (if a specific floor was chosen)
- Selected camera FOVs (if FOV layer is enabled and cameras are selected)
- Branding elements (logo and watermark) if enabled
- Quality and format settings as configured
Tips
- Use the "Select All" button to ensure your entire project is visible before exporting
- Hide layers you don't need to create cleaner, more focused exports
- For multi-story buildings, export each floor separately for better detail and organization
- Use High quality for client presentations and printing, Medium for digital sharing
- Test your branding settings with a low-quality export first to verify logo position and size
- Select specific camera FOVs when creating focused coverage analysis documents
- PDF format is better for printing and professional documentation, JPG is better for digital presentations
- Remember that Free version exports will always include a watermark indicating it's a free version